Quick-Time Events: Why and How To
Hello everyone! I'm Dan, one of our programmers working on Hexbreaker. Today I wanted to share with you all the thought process behind our quick-time event system, and how to get started with making one of your own in Unity. For the tutorial below, you'll want to already have a basic understanding of C# and be familiar with the Unity interface.
Why Have Quick Time Events?
For Hexbreaker, we knew wanted to have a combat system that was relatively simple to understand. Typically, games with turn-based combat systems tend to have many complicated, interlinked aspects that create a greater whole when they come together in the combat system- it is one way to provide the player with plenty of opportunities to strategize and have fun doing so. Because Hexbreaker is intended to be simpler, we wanted to add another layer to the combat system that allowed the player to take a more active role and be rewarded when doing so. We wanted to achieve that by implementing quick-time events that are linked to the player's actions. This helps keep combat fast-paced and provides the player with immediate feedback from their actions. One example of a game doing this successfully is Paper Mario, where the player is prompted to act alongside Mario every time they take an aggressive action in combat, determining the effectiveness of said action. In Hexbreaker, we are aiming to have each type of attack the player can take to have an identity of it's own. One way we can achieve that is by assigning said action it's own QTE prompt that the player can become familiar with.
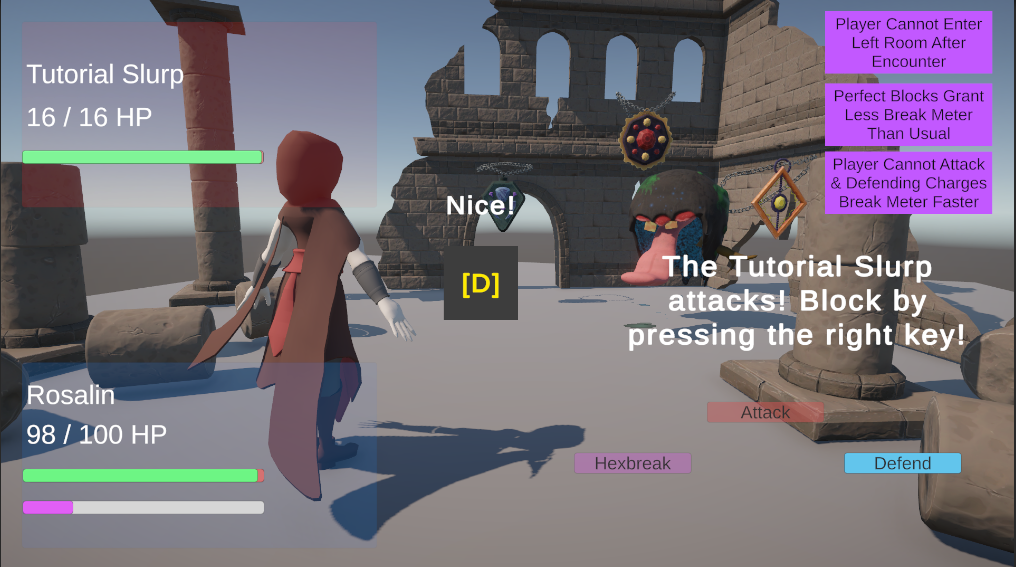
Getting Started With A Quick Time Event System
If you want to create a quick time event system in your game, there are a few things we'll need to do to get started:
. Add a Panel in your scene's canvas. Call it EventPanel, or whatever else you'd like to call it.
. Add a Text or TextMeshPro object under the EventPanel. This is where we will display which button the player is prompted to press.
. Add another Text object under the EventPanel. This is where we will display information, like whether the player succeeded or failed.
. Add a Button object to the scene. We'll use this to trigger the QTE prompt while testing.
And that's it! Now we can create the script. Let's call it "QTEManager". We'll want to reference the EventPanel in the script, alongside the text objects.
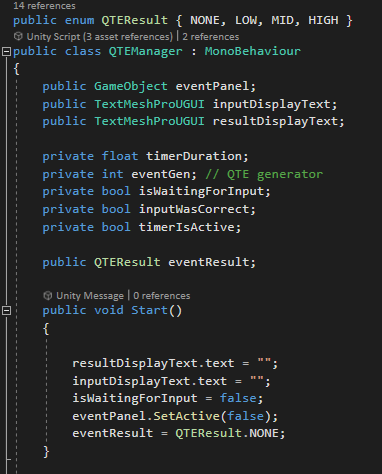
Now we'll want to make a few variables we're going to use throughout the script. It should look something like this:
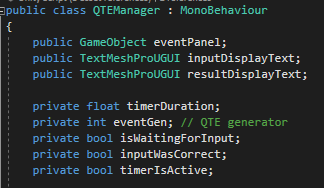
eventGen will be the number that indicates which key we need to press. The other variables should be self-explanatory.
We'll want our Start function to set the scene for now.
Set both the inputDisplayText and the resultDisplayText's text values to be blank. Then setthe isWaitingForInput bool to false and deactivate the eventPanel, like so:

Now we move on to the Update function. Here's where the magic happens.
We'll start by making an if statement.
if isWaitingForInput == true, then we want to detect any key presses. We do that by writing another if statement using Unity's Input system:
if (Input.anyKeyDown), then we make a switch statement checking for eventGen. We will use this switch statement to check for every possible value of eventGen that we want to consider in our button prompts. This will depend on how many buttons you'll be specifically checking for in your game. In Hexbreaker we will only check 4 different buttons.
For each case, we check if the button that was pressed corresponds to the value of eventGen we intended. If it is indeed the button that corresponds to that case value, then we set inputWasCorrect to true, and we call the InputReceived() function, which we'll create later.
The Update function should now look something like this:
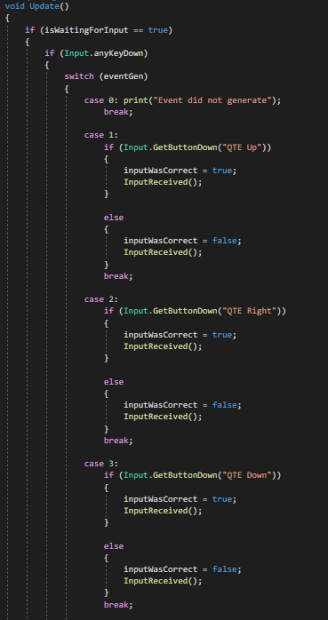
To reiterate, the Input checks for each case will depend on what you want for your game. You can replace the Input.GetButtonDown statements with Input.GetKeyDown("correctKey") where you place whatever key it is you want to check for instead of "correctKey". Your game may want to check for more or less keys that Hexbreaker, so feel free to expand the switch statement as you wish.
Once you close the switch statement with a default case and break;, we'll be finished with the Update method.
Now we want to create the InputReceived() function.
In it, we reset the value of eventGen to 0, make another if statement to check if inputWasCorrect is true or false, and write whatever code you want to let the player know that they either succeeded or failed. We will be using Coroutines in order to wait for the player to read the result and then clear it all up, as well as to create the timer. After either result, we'll want to write StartCoroutine(ClearQTESequence()). ClearQTESequence is a coroutine we'll make later. For Hexbreaker, the InputReceived() function looks like this:
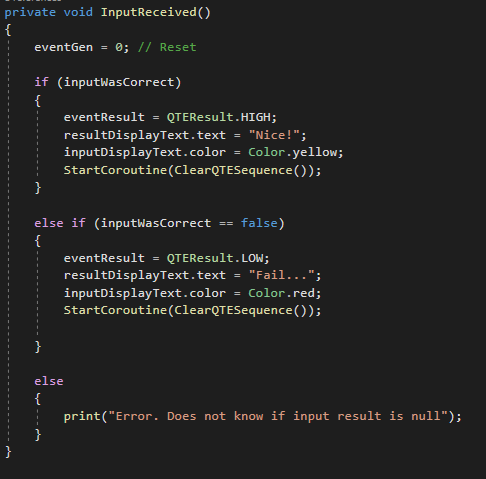
The lines "eventResult = QTEResult.HIGH/LOW" is used in Hexbreaker to indicate degrees of success. You may not need this in your game, but I'll cover it at the end of the tutorial. For now, ignore it.
Next we make the ClearQTESequence() coroutine. If you've never used coroutines before, know that they differ from functions in that you must declared them like so:
IEnumerator ClearQTESequence()
{
// Here you write code you want to run asynchronously to the rest of the script.
// If you'd like for the code here to wait for a few seconds before running, you can do that like I have below
yield return new WaitForSeconds(2f); // This will wait for 2 seconds before continuing.
}
The neat part about coroutines is that they allow us to run code separately from any other function you're running in that script.
In this particular coroutine, we'll want to reset all of our text and values to get the system ready for another quick time event prompt in the future. It should look like this:
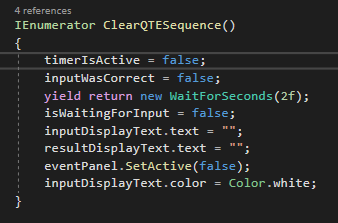
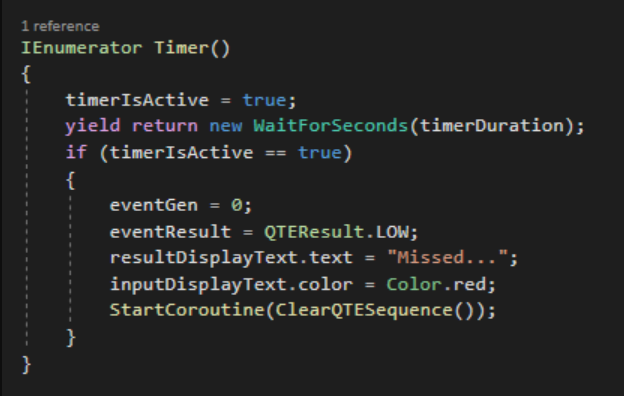
Now we'll make a new coroutine: the Timer. The Timer will run asynchronously when the QTE event is generated, and will indicate the prompt has failed when it runs out of time.
We declare the IEnumerator Timer(). In it, we set timerIsActive to true, wait for a number of seconds equal to what we have set the timerDuration float to be, and then we check if the timerIsActive is still set to true. If it is, we fail the player and call the ClearQTESequence() coroutine again. It should look something like this:
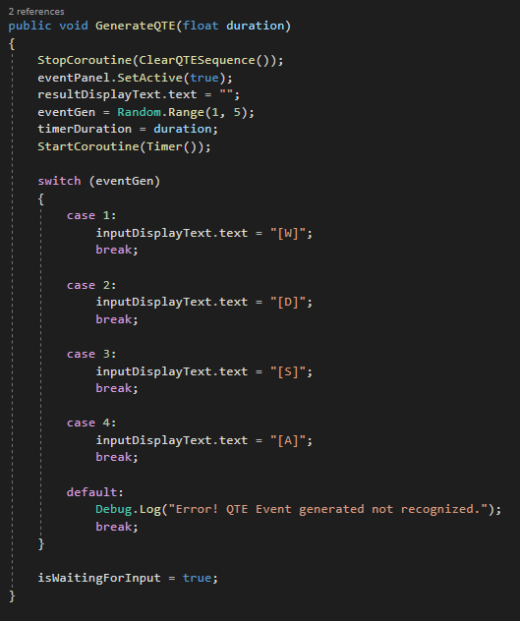
Now all we need is the function that will prompt the QTE to appear, GenerateQTE(). For this function, we want to pass a float when the function is called. This will allows us to set a unique duration for the timer when the function is called. We'll call this float "duration".
If a new QTE was prompted before the last one was fully cleared, we want to make sure it stops, so we call the StopCoroutine(ClearQTESequence()) method.
We set the eventPanel to be active so that it shows up in the canvas during runtime, reset the result display text, and set eventGen to be equal to a random number between 1 and the number of unique keys you are checking for in your switch statement in your update function.
Remember that the ceiling of the number that can be generated with the Random.Range() function is meant to be one number higher than what you actually intend, so set Random.Range(1, (the number of unique keys you want to check + 1));
Then we make timerDuration to be equal tot he duration we passed through when we called the function.
Now we start the Timer() coroutine, and finally we set a switch statement similar to the one in update function, except that for each case, we will display the key we want the player to press for that number.
At the end of it all, we set isWaitingForInput to be true, and *that* is what will indicate to the update function that we are ready to check for an input. And that is it! We have all we need to get this system working.
Now, in the scene's inspector, set the button we created at the beginning to call the GenerateQTE, passing the number of seconds (in float value) that you want the timer to wait for, and the QTE should play accordingly.
Now, in Hexbreaker we check the degree of success of the player after a QTE. The way I chose to handle it is I created a QTE state called QTEResult that updates after a QTE has been performed. This is done by creating a public enum above the QTEManager class declaration, setting the possible states, and declaring a public QTEResult variable (which I named eventResult). Then I update it when the player succeeds or fails a QTE. I reference that state in my combat script to determine how much damage the player deals and how well they are able to block incoming damage when they defend. The final state of the QTEManager for this tutorial looks like this:
That will mark the end of this tutorial. We're hoping to expand this system to reach our goal of providing more unique types of button prompts, like mashing buttons to fill a bar, prompting a fighting game-esque sequence of buttons, and timing the button prompt at the right time like a rhythm game in the future. Stay tuned for more updates and DevLogs in the future!
Get Hexbreaker
Hexbreaker
Death is not the end in this realm, merely a setback in your efforts.
| Status | Released |
| Authors | cfringerwtcc, dmgrummerwtcc, Arissa Guard, ddsanchezWT, Jacksonmgb |
| Genre | Action |
| Tags | 3D, paranormal, Roguelite, Singleplayer, Turn-Based Combat |
More posts
- Hexbreaker: Pen & Paper PrototypingJul 24, 2023
- Hexbreaker: Skyboxes for UnityJul 18, 2023
- Hexbreaker: Feature UpdatesJul 11, 2023
- Hexbreaker: Expanding Character with ParticlesJul 04, 2023
- Hexbreaker: Button Sprite SwapsJul 03, 2023
- Hexbreaker: Character DesignJun 27, 2023
- Hexbreaker: Randomization and ReplayabilityJun 20, 2023
- Hexbreaker: How to create foliage!Jun 12, 2023
- Hexbreaker: The First DevlogMay 30, 2023
Leave a comment
Log in with itch.io to leave a comment.